Note: I cover the use of Secure SHell (SSH) in Chapter 5 of my book, Using and Administering Linux: Volume 3: Zero to SysAdmin, Network Services and much of this article is based on that chapter.
Introduction
SSH is an important mechanism for secure connections between Linux hosts. SSH is a software based virtual private network (VPN) tool that can create a secure VPN whenever needed. It can be used to securely login to any remote host so long as you have proper credentials and it can be used to enhance tools such as tar and other backup programs like rsync so that remote hosts can be easily backed up to a local system. Administration tools such as Ansible use SSH to send administrative commands to remote hosts. The scp (secure copy) program uses the SSH encrypted tunnel to copy files between a remote host and a local one.
Let’s ensure we have our terminology straight. In this article the local host is always the one into which you type commands and the remote host is any host that you communicate with via a network connection whether it is next to your local host or halfway around the world.
In this article we explore SSH in some depth and use it to communicate between separate host systems. We will also use Public/Private Key Pairs for an authentication method that is more secure than using passwords. We will see how SSH works to create and maintain secure connections, use SSH for secure file transfers. We will also generate and use Public/Private Key Pairs (PPKP) for authentication.
The name Secure Shell is misleading. SSH is not a shell, it is only a set of connection protocols that enables secure, encrypted links between two computers. An SSH login to a remote host uses the default shell of the user on the remote host. In most cases this would be Bash, but some users prefer other shells and have designated them as their default shell. Whichever shell the use as their default will be the shell used for the SSH connection.
The SSH protocol provides three properties that are important for network communications.
- It provides reliable authentication for the identities of the hosts as well as the users. It ensures that the hosts and users are who they claim to be.
- It encrypts the communication between the hosts, including the transmission of any login ID and password or Public/Private Key Pairs (PPKP).
- It ensures the integrity of the transmissions and can detect and notify the user if data is missing, added, or changed.
Using SSH for inter-host communications is an excellent security precaution and can prevent data that is transmitted over any part of a public network from being intercepted, blocked, or altered. As with all security tools, SSH is not the complete solution and other security precautions must also be taken. But SSH ensures secure communications can be easily accomplished.
Any Linux host can be an SSH server and it makes sense to do so in order to facilitate easy communications and the ability to perform administrative tasks on remote hosts. The following examples are suitable for experimenting on your own setup. I suggest you use a couple virtual machines for testing. I use a pair of VMs, testvm1 and testvm2.
Configuring the SSH server daemon
We do not need to do much to configure SSHD, the SSH server. Just change one line in /etc/ssh/sshd_config from:
#PermitRootLogin prohibit-password
to:
PermitRootLogin yes
This change allows us to login as root from a remote host using a password. It does make life easier in the long run because we need to log in as root using a password in order to copy the public key from other hosts that need to log in to this one.
Starting the SSH server
Start the SSHD server daemon on testvm2 and enable it so it will start on boot. The default SSHD configuration is perfect for our needs and it allows direct login by the root user. If your SSH server is already up and running, you can restart or reload it in order to activate the revised configuration. Note that the enable sub-command creates a link to the SSHD service so that systemd will start it every time the system boots.
[root@testvm2 ~]# systemctl start sshd ; systemctl enable sshd
Created symlink /etc/systemd/system/multi-user.target.wants/sshd.service → /usr/lib/systemd/system/sshd.service.
[root@testvm2 ~]#
That was easy and our testvm2 host is now ready for us to try out an SSH connection. In a terminal session as the user student on testvm1, ssh to testvm2.
[student@testvm1 ~]$ ssh testvm2
The authenticity of host 'testvm2 (192.168.56.1)' can't be established.
ECDSA key fingerprint is SHA256:NDM/B5L3eRJaalex6IOUdnJsE1sm0SiQNWgaI8BwcVs.
Are you sure you want to continue connecting (yes/no)? yes
Warning: Permanently added 'testvm2,192.168.56.1' (ECDSA) to the list of known hosts.
Password: <Enter the password for student on testvm2>
[student@testvm2 ~]$
The first time an SSH connection is made to any host the authenticity message shown above is displayed along with the fingerprint of the private key of the remote host. In a very security conscious environment we would have already received a copy of the remote host’s key fingerprint in an email or hard-copy document. This allows comparison so that we know we are connecting to the correct remote host. This is not the security key, it is a fingerprint that is unique to that host’s private key. It is impossible to reconstruct the original private key from which the fingerprint was generated.
You must type “yes” – the full word – in order to continue the login. Then you must enter the password for the user account on the remote host.
Now look at the /home/student/.ssh directory. Then look at the contents of the ~/.ssh/known_hosts file on testvm1. You should see the public host key for the remote host, testvm2. This file is created in the local host, the one we are connecting from, and not on the remote host, the one we are connecting to. Each host we connect to will have a unique signature of its own in our known_hosts file to identify it for future connections.
[student@testvm1 ~]$ cat .ssh/known_hosts
testvm2,192.168.56.1 ecdsa-sha2-nistp256 AAAAE2VjZHNhLXNoYTItbmlzdHAyNTYAAAAIbmlzdHAsdfgwrttryhJKHGge0HCRSJpsx0AlU6fXiVRlc/RwQRvFkMbl05/t7wSFcw0G8tRSiNaktVs4dxpAoMbrT3c=
[student@testvm1 ~]$
After accepting this key during the first connection to the remote host, the connections initialize a little faster because the two computers now know each other and can identify themselves via the keys. The host keys are stored in /etc/ssh along with the SSH client and server configuration files. List the contents of that directory to view the various key files.
Now configure and start SSHD on testvm1 just as you did on testvm2. As the root user on testvm2, connect to testvm1 and verify that connection works as well. Type exit to disconnect the SSH connections. Exit from all SSH connections if there are more than just the one.
Now we know that the SSH server on both hosts are working as they should and can accept connections from remote hosts. But there is so much more.
How SSH works – briefly
Let’s look briefly at the sequence of events that take place when an SSH connection is made between hosts.
- On testvm1 enter the ssh testvm2 command.
- The local host establishes an unencrypted TCP connection to the remote host.
- The remote host sends its own public key to the local host which compares it to the one for that host in ~/.ssh/known_hosts. This authenticates the remote host.
- The two hosts negotiate the encryption algorithm to use and start it so that all further communications are performed through the encrypted channel.
- The local host prompts the user for their password and sends it to the remote server over the encrypted channel.
- The remote server verifies the password is correct and permits the login to proceed.
- The remote host launches the user’s default shell – usually Bash as defined in /etc/passwd.
If no user is specified as part of the ssh command in user@host format, the user issuing the command is assumed by SSH to be the user to connect with on the remote host.
SSH can multiplex many different concurrent channels over the authenticated SSH connection. This allows tunneling of login sessions and TCP forwarding so that other protocols such as Telnet and the X Window System, that are not normally encrypted can use this encrypted channel.
SSH today is normally implemented with OpenSSH1. Until September 2000, SSH was still encumbered with patents and other proprietary restriction, but those restrictions all expired at that time. There are still commercial versions of SSH available but there is no reason to use them on Linux. Fedora, and at least some other distributions I have tried, install both the client and server by default and allow root access by default.
Public / Private Keypairs
As an alternative to using passwords, a Public/Private Key Pair (PPKP) can be used. PPKPs are used to enhance security by – mostly – removing the need for passwords to initiate SSH connections to a remote host. For the user, this is more secure because it eliminates the need to memorize and the temptation to write down long but good passwords.
Each host already has a unique PPKP that was generated during first boot after install. Those host-level key pairs are stored in the /etc/ssh directory. The host’s public key is swapped at the first SSH connection during the initial handshaking protocols. These host keys are used to positively identify the hosts to each other and are used to launch the initial encryption of the connection so that the authentication sequences are secure.
But we also want to ensure that each account that communicates from one host to another is also secured with a PPKP.
How PPKPs work
Suppose that I want to send you encrypted messages that only you – and others with the public key – can read. I need to be able to encrypt it and you need to be able to decrypt it. Cryptology texts are full of ways to do this that involve various types of keys and varying levels of security. Shared keys are fine until the key is compromised. I may not know that the key we share has been compromised and will keep sending messages that can be intercepted and read by the very people I might want to keep them from.
The use of public/private key pairs resolves this problem in a very elegant and secure manner. The key (if you will pardon the pun) is that the public key is the only one that can decrypt messages encrypted by the private key and the private key is the only one that can decrypt messages encrypted with the public key. I had to think about that for a few minutes when I first heard it.
- Create a public/private key pair.
- Send the public key to the remote computer which will be decrypting my messages and encrypting the reply messages back to me.
- Encrypt messages with the private key and send then to the remote computer.
- The encrypted message is decrypted by the remote computer using public key.
- To respond, the remote computer encrypts the message using the public key from my host and sends it to my host.
- The message encrypted by the public key is decrypted on the local host using the private key.
Of course these messages are the data contained in the TCP packets sent between the computers.
There are some interesting implications from all this. First, anyone who has the public key can decrypt the messages (data packets) that I send. Therefore I can send my one public key to many different computers and then use SSH to connect to them all using the single private key. I do not need a separate set of keys for each computer.
Another inference that we can make is that anyone with the public key can send me messages. However only I can initiate a conversation by using the private key. If another host wishes to initiate a conversation they must create a PPKP and send a copy of their public key to me. So someone cannot just obtain a copy of my public key and then use it to initiate encrypted connections to my host computer.
I could send my public key to the user of the host on the other end in an email and the user at that end could then append it to their ~/.ssh/authorized_keys file. However, there is a tool that I can use to install my public key on the remote host so long as I have the password of the user account with which I want to communicate. Therefore, without the cooperation of a friendly user at the remote host, or already having my own user account and password, I cannot just push my public key across the network and login to any random remote host.
This is all very nice and secure which is, of course, the intention. The PPKP may also use an arbitrarily long optional passphrase for an additional level of security.
So I am limited to SSH connections to remote hosts on which I have an account and know the original password. This reduces to the student user (or the root user) having an account on both testvm1 and testvm2 and sending the public key from one host to another.
Creating the PPKP
On the testvm1 host as the student user, use the following command to create a public / private key pair. The -b 2048 option generates a key that is 2048 bits in length, the minimum allowable length is 1024 bits. By default it will generate an RSA key but we could also specify other key types. RSA is considered to be very secure so we will use RSA. We will press Enter to respond to all inquiries so as to take all of the defaults.
[student@testvm1 ~]$ ssh-keygen -b 2048
Generating public/private rsa key pair.
Enter file in which to save the key (/home/student/.ssh/id_rsa): <Enter>
Enter passphrase (empty for no passphrase): <Enter>
Enter same passphrase again: <Enter>
Your identification has been saved in /home/student/.ssh/id_rsa.
Your public key has been saved in /home/student/.ssh/id_rsa.pub.
The key fingerprint is: SHA256:y/y5kKXhceb093iLg3Xh0ZGIqFBsEZSTXi3cdKh22fY student@testvm1
The key's randomart image is:
+---[RSA 2048]----+
|                 |
|                 |
|    o    . .     |
| . . . +   o = . |
|. +  + . S  B +  |
|oo o  X  + B + . |
|o=. @ *  *   o . |
|o  =*   =   =  E |
| o   .o   ..+  . |
+----[SHA256]-----+
[student@testvm1 ~]$
The host key’s fingerprint and/or the randomart image can be used to verify the validity of a public key for the host. It cannot be used to recreate the original public or private key and it cannot be used for communication. It is used only to verify the validity of the key.
Now that we have generated our key pair, look again at the contents of the ~/.ssh directory for the student user on testvm1. You should see two new files, id_rsa which is the private key, and id_rsa.pub which is the public key. The .pub extension kind of gives that away.
These days it is not necessary to send our public keys via email or other off-network type of delivery. We have a nice tool for that. Do this as the student user on testvm1.
[student@testvm1 ~]$ ssh-copy-id testvm2
/usr/bin/ssh-copy-id: INFO: Source of key(s) to be installed: "/home/student/.ssh/id_rsa.pub"
The authenticity of host 'testvm2 (10.0.2.11)' can't be established.
ECDSA key fingerprint is SHA256:NDM/B5L3eRJaalex6IOUdnJsE1sm0SiQNWgaI8BwcVs.
Are you sure you want to continue connecting (yes/no)? yes
/usr/bin/ssh-copy-id: INFO: attempting to log in with the new key(s), to filter out any that are already installed
/usr/bin/ssh-copy-id: INFO: 1 key(s) remain to be installed -- if you are prompted now it is to install the new keys
Password: <Enter password of the user on the remote host>
Number of key(s) added: 1
Now try logging into the machine, with: "ssh 'testvm2'" and check to make sure that only the key(s) you wanted were added.
As the student user on testvm1 open a new terminal session if necessary. Create a file named random.txt.
[student@testvm1 ~]$ dd if=/dev/urandom of=random.txt2 bs=512 count=500
500+0 records in
500+0 records out
256000 bytes (256 kB, 250 KiB) copied, 0.00304606 s, 84.0 MB/s
[student@testvm1 ~]$ ll rand*
-rw-rw-r-- 1 student student 256000 Jun 18 14:50 random.txt
Now we can copy this file to the remote host. We use the tilde (~) which is expanded by the shell to the home directory of the student user on the remote host.
[student@testvm1 ~]$ scp random.txt testvm2:~
Running /home/student/.bashrc
[student@testvm1 ~]$
Now you can create a PPKP for the root user on testvm1 and copy the public key to testvm2. Also create PPKPs for both the root and student users on the testvm2 host and copy them to testvm1. This sets up a situation where users can SSH easily from one host to another.
X-forwarding
We now have SSH working and tested. There is more fun stuff ahead. Let’s start by running a GUI program on the remote host with the display of the program’s window on the local host. Most modern Linux GUI desktop systems use the Wayland2 windowing system, or the X Window System3, aka, X, as their underlying windowing engines. X-forwarding works in either event because they both use the same protocols and are just different implementations of those protocols.
Do this as the student user on the testvm1 host. First, ssh from testvm1 to testvm2 using the -X (uppercase) option to specify the use of X-forwarding. The message regarding the Xauthority file is normal at this stage and the file will be created without user intervention.
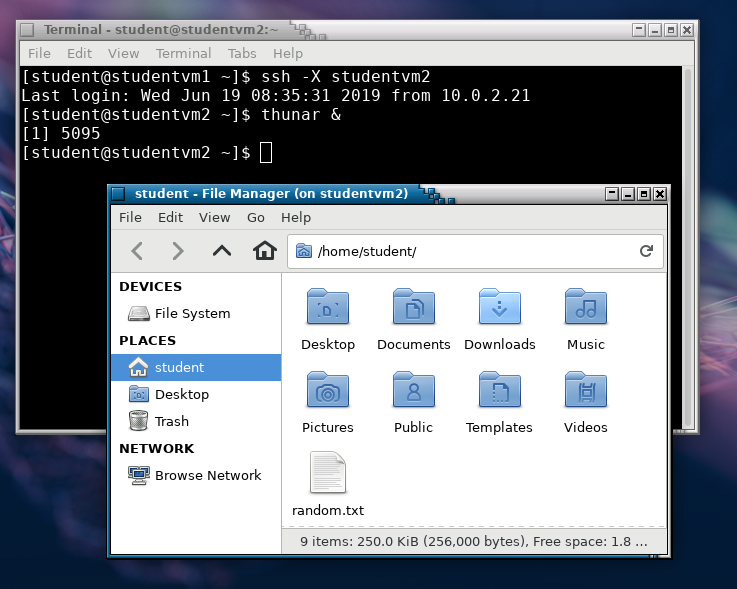
[student@testvm1 ~]$ ssh -X testvm2
Last login: Wed Jun 19 08:31:28 2019 from 10.0.2.21
/usr/bin/xauth: file /home/student/.Xauthority does not exist
[student@testvm2 ~]$ thunar &
[1] 2683[student@testvm2 ~]$
The result of this is shown Figure 1 as a screen capture of the testvm1 host desktop. It shows the effects of using X-forwarding via SSH to display the Thunar file manager running on testvm2 on the desktop of testvm1. Navigate around the directory structure on testvm2 for a bit.
Now install some fun and interesting Xorg programs. As root on testvm2, install the xorg-x11-apps package on testvm2 but not testvm1.
[root@testvm2 ~]# dnf -y install xorg-x11-apps
As the student user on testvm2, login to the GUI desktop if you are not already, open a terminal session, and start the xeyes (X eyes) program. The ampersand is used to run the program in the background which detaches it from the terminal session so you can enter more commands. Otherwise the terminal session is blocked until the called program, xeyes, terminates.
[student@testvm2 ~]$ xeyes &
[1] 23848
[student@testvm2 ~]$
Now, as the student user on testvm1, try to start xeyes. It fails because we did not install the xorg-x11-apps package on testvm1.
[student@testvm1 ~]$ xeyes &
-bash: xeyes: command not found
[1]+ Exit 127 xeyes
[student@testvm1 ~]$
From the testvm1 desktop, use the SSH connection to testvm2 that has X-forwarding enabled. Enter the same command. Move the mouse pointer to see the eyes follow it.
The ampersand (&) after the command specifies that the command is to run in the background; that returns the terminal session to a command prompt while leaving the GUI program to run. That will not affect running the specified program like Thunar or xeyes but if you run Thunar without the & the terminal session does not return to a command prompt. You would need to terminate Thunar or login remotely again to get a command line from which to launch xeyes.
Have some fun with this for a minute or two and then close down both Thunar and xeyes. The xeyes program must be moved or closed from the application bar because it has no window frame to manipulate.
This capability can be both fun and useful.
The X Window System
Because X-forwarding over SSH is a client/server type of operation, let’s look at the details a little more closely.
Tip: Although some people call it X Windows or X-Windows, to be technically and legally correct, it should be called the “X Window System” or just “X”.
It seems pretty clear that a standard SSH connection takes place from the client on the local host to a server on the remote host. We have, in fact done that over the course of these experiments. But is that also true of X-forwarding over SSH?
To understand this we need to know more about the X Window System4. Wikipedia has a rather old article describing the X Window System and some of its history. The short version is that the X Window System is a windowing system for Unix-like operating systems such as Linux. X does not do anything other than provide the primitive graphical tools to create and manipulate windows and objects on a bit-mapped display. It does not impose any aspect of the user interface such as how it looks or how users and application programs can interact with it.
The X Window System uses a client-server model which separates the applications and their requests from the server functions that fulfill those requests. This allows X to be versatile and creates the base for X-forwarding. However it is necessary to think about the client-server model from the perspective of the application rather than of the user, which is how we normally think of it. Let’s do this thinking about the way we did it previously where we used SSH from the local host, testvm1 to connect to the remote host, testvm2, and then started applications running on testvm2 with the applications’ windows displayed on testvm1.
- We use the mouse on testvm1 to select a folder in Thunar.
- Thunar, running on testvm2 opens the folder and generates a series of graphical commands that cause the redrawing of the Thunar window. This is a client request to the X server.
- Those commands are sent to testvm1 where the X server translates them into the new images in the Thunar window. This is the X server fulfilling the request from the client.
Most of the time, the server and the client are located on the same host but they can be located on different hosts as seen in the preceding experiment. This is only possible because the client and server functions are separate.
Remote commands
Although using SSH to perform remote commands may sound like logging in to a remote computer using SSH and then typing in commands on the remote Bash shell, there is a significant difference. And that little difference is what makes SSH such a powerful tool.
Let’s start with a simple task like checking the contents of a directory on the remote host. Do this little experiment as the student user. Our objective is to determine the contents of the student user’s home directory on the remote host. As the student user on the testvm1 host, run the following command. This can only be accomplished without using a password if a PPKP is in place. The quotes are used to delimit the command being sent to the remote host but can actually be dispensed with for simple commands like this. For more complex commands they are quite useful and necessary.
Your results will probably be different from mine.
[student@testvm1 ~]$ ssh testvm2 "ls -l"
total 284
drwxr-xr-x. 2 student student 4096 Dec 24 08:19 Desktop
drwxr-xr-x. 2 student student 4096 Dec 22 13:15 Documents
drwxr-xr-x. 2 student student 4096 Dec 22 13:15 Downloads
drwxr-xr-x. 2 student student 4096 Dec 22 13:15 Music
drwxr-xr-x. 2 student student 4096 Dec 22 13:15 Pictures
drwxr-xr-x. 2 student student 4096 Dec 22 13:15 Public
-rw-rw-r--. 1 student student 256000 Jun 19 08:16 random.txt
drwxr-xr-x. 2 student student 4096 Dec 22 13:15 Templates
drwxr-xr-x. 2 student student 4096 Dec 22 13:15 Videos
We can have a bit more fun with this.
[student@testvm1 ~]$ ssh testvm2 "cp random.txt textfile.txt ; ls -l"
total 536
drwxr-xr-x. 2 student student 4096 Dec 24 08:19 Desktop
drwxr-xr-x. 2 student student 4096 Dec 22 13:15 Documents
drwxr-xr-x. 2 student student 4096 Dec 22 13:15 Downloads
drwxr-xr-x. 2 student student 4096 Dec 22 13:15 Music
drwxr-xr-x. 2 student student 4096 Dec 22 13:15 Pictures
drwxr-xr-x. 2 student student 4096 Dec 22 13:15 Public
-rw-rw-r--. 1 student student 256000 Jun 19 08:16 random.txt
drwxr-xr-x. 2 student student 4096 Dec 22 13:15 Templates
-rw-rw-r--. 1 student student 256000 Jun 20 08:22 textfile.txt
drwxr-xr-x. 2 student student 4096 Dec 22 13:15 Videos
[student@testvm1 ~]$
So that works as we expect. But try the same command without quotes. You will see that the remote command ends at the semicolon that the local shell uses to delimit the final command. The quotes are required so that the shell can properly send the entire command to the remote host.
Tip: Bash shell aliases such as the ll command are not available when using remote commands. So be careful when using scripts containing remote commands to not use command aliases.
Remote backups
The term “remote backups” may be a bit misleading, even with what we now know about running commands remotely. For many years I used a script to perform backups on my main workstation and several remote hosts. I used remote commands to perform the remote backups to the local workstation.
Making backups of remote hosts is much easier than you might think. We will use the venerable tar command to create our backups. Do this as the root user on testvm1. We start with the simple task of creating a backup of the remote host, testvm2, with the resulting backup stored on the remote host. Working on testvm1, we will make a backup of /home, /root, and /etc on testvm2 and store the backup tarball in testvm1:/tmp.
[root@testvm1 ~]# ssh testvm2 "tar -cvf /tmp/testvm2.tgz /home /etc /root ; ls -l /tmp"
Verify that the tarball /tmp/testvm2.tgz contains the files we expect. But do it from testvm1.
Now let’s look at something and try to make a bit of sense from it.
[root@testvm1 ~]# ssh testvm2 "tar -c /home /etc /root"
Do you see what happened? The data stream from the tar command that was executed on the remote host, testvm2, is sent across the SSH connection to the standard out (STDOUT) of the terminal session on the local host, testvm1. So now we have the data stream from a remote host here on our local host just waiting to be piped or redirected – on our local host. Got it yet? Note where we place the closing quote in this next simple command line program.
[root@testvm1 ~]# ssh testvm2 "tar -cz /home /etc /root" > /tmp/testvm2.tgz ; ls -l /tmp
tar: Removing leading `/' from member names
tar: Removing leading `/' from hard link targets
total 287352
-rw-r--r-- 1 root root 104151040 Jun 17 14:47 backup.tar
-rw-r--r-- 1 root root 33189296 Jun 17 14:52 backup.tgz
<snip>
-rw-r--r-- 1 root root 6259259 Jun 20 08:57 testvm2.tgz
<snip>
We have used an SSH remote tar command to create a stream consisting of the backup data from the remote host. That data stream is sent across the SSH connection to STDOUT on the local host where it can be used with other commands through pipes or redirected to a file. We also performed a backup of a remote host and stored the backup file on the local host, all with a simple command line program.
Once I had created an easy and elegant method for creating backups of remote hosts using tar and SSH, the next step for me was to create a script that would perform that same backup on several hosts and then set up a cron job or a systemd timer to do those backups every night.
Summary
SSH uses two levels of authentication, first authenticating the hosts themselves and then user authentication. It encrypts the entire session including the authentication and all of the data transmission. SSH is very secure and can be used to transmit data securely over public networks.
SSH features such as remote command execution and data stream transmission over the encrypted connection enable powerful solutions for things like backups using simple tools like tar. SSH also provides X-forwarding so that we can run graphical programs on the remote host with their windows on our local host.
1OpenSSH, http://www.openssh.com
2Wikipedia, Wayland, https://en.wikipedia.org/wiki/Wayland_(display_server_protocol)
3Wikipedia, X Window System, https://en.wikipedia.org/wiki/X_Window_System
4Wikipedia, X Window System, https://en.wikipedia.org/wiki/X_Window_System