
There are a lot of articles on the Internet for moving a Thunderbird configuration from one computer to another. Most of these articles are filled up with stuff intended to help winblowz users do nothing more than copy the Thunderbird profile from one computer to another, perhaps perform a rename, and some other unnecessary stuff.
This article is intended for migrating from one Linux computer to another.
The right way for Linux
The right way to do this for Linux is a simple process and the last step almost does not count.
- Install Thunderbird on the new computer.
- Copy the files from the old computer or a backup medium to the new computer.
- Open the Thunderbird Profile Manager and select the desired profile.
- Click the button that says Start Thunderbird.
The details
So the details are important but still simple. In my case I was migrating my Thunderbird profile from a Fedora 31 workstation to a POP_os! (Ubuntu 18.04) System76 laptop.
If you have been around Linux for any amount of time, this procedure is easy. This is not an article about how to do a copy and I assume you have some basic skills – the ability to copy files and install software using the command line being among them.
Install Thunderbird
On my Fedora hosts, this is as simple as using DNF to install the most recent Thunderbird package on the target Linux host.
On some other distributions like Ubuntu 18.04, for example (as of this writing), the most recent available package gave me errors when I tried to run the Thunderbird profile manager. Those errors indicated that the profile contained file formats newer than those usable by the installed version of Thunderbird. If you get such a message, download the most recent version of Thunderbird from https://support.mozilla.org/en-US/products/thunderbird.
If you download Thunderbird direct from the Thunderbird web site, use the the instructions at https://support.mozilla.org/en-US/kb/installing-thunderbird-linux to perform the installation. Be aware that these instructions install Thunderbird in your home directory and not in a globally available directory. Only you will have access to Thunderbird in this scenario. This is why installation using a package manager with a current version of Thunderbird is the best option.
Regardless of which method you use, do not launch Thunderbird on the target Linux host yet.
Copy the files to the new computer
First, on the source Linux host, exit from Thunderbird if it is running.
There are a number of ways to do the copy but I like the easiest. I use secure copy (scp) over the network to perform a copy of the entire ~/.thunderbird directory to your home directory on the new computer. Another option would be to first copy the ~/.thunderbird directory to a thumb drive and then from the thumb drive to your home directory on the new computer.
Select the profile
In this step we select the correct – or possibly only – profile using the Thunderbird Profile Manager. On the GUI desktop of the target host, open your favorite terminal emulator. Then enter the command
~/thunderbird/thunderbird -profilemanager &That command opens the profile manager window on the desktop. The trailing & launches the profile manager in the “background wth respect to the terminal session so that the terminal session is available for additional commands. Without the &, the terminal session would be unavailable until Thunderbird is closed.
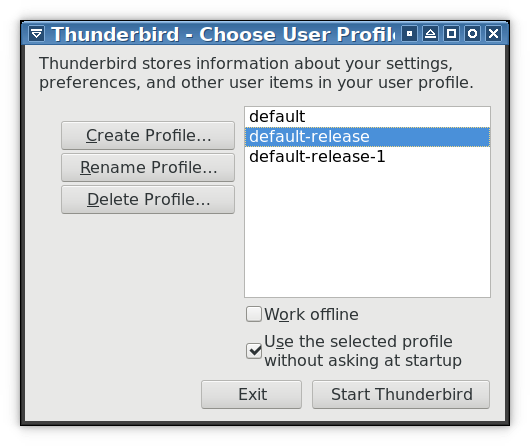
Figure 1 shows the Thunderbird profile manager with my preferred profile selected. Note that this tool also allows you to delete or rename profiles. After selecting the profile, even if there is only one, click on the Start Thunderbird button to proceed into the main Thunderbird interface. All of your email folders and emails should be there as well as your add-ons.
At this point your migration is complete and you should be able to manage your email just as you did on the old computer.