This document takes you through the process of preparing for and installing Fedora Linux on your computer. This document is good for Fedora 15 through Fedora 17. The installation for Fedora 18 and higher has completely changed and will be covered in Installing Fedora Linux 18 and Above.
A minimal system does not have any type of graphical interface and is an excellent platform for use as a firewall, router, or any type of server such as a web, FTP or email server. It can be used as all of these at the same time. This document will install a basic system with the KDE Desktop. Any additional functionality required later can be added as it is needed using the YUM package manager.
The partitioning for this system will include a single standard EXT4 partition for /boot which cannot be part of a Logical Volume. The rest of the hard drive will be used as a Physical Volume (PV) on which Logical Volumes will be created for the rest of the filesystems. Not all of the PV will be used so that free space can be used later.
Note: This document depicts a sample installation and is intended for learning purposes only and is not intended for production use.
You may use this document to develop your own installation procedures that meet the needs of your environment.
- Insert the Fedora Linux installation DVD provided by the instructor into the DVD drive of your computer.
- Reboot or turn on the computer.You will use the graphical installation because it allows more control over disk partitioning. At the installation Welcome screen, choose “Install a new system or upgrade an existing system” and press the Enter key.
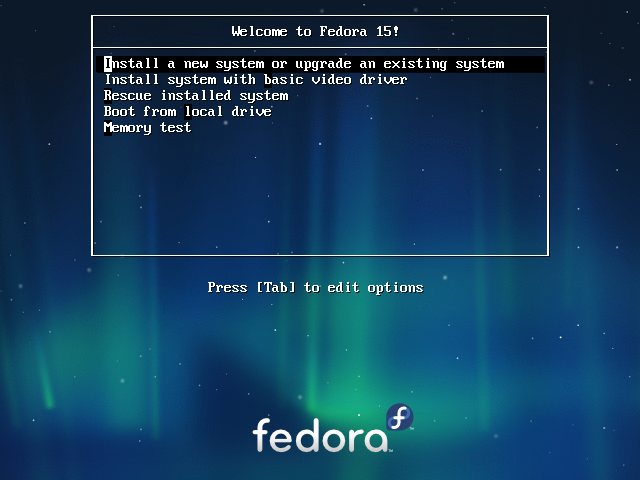
Illustration 1: The Fedora 15 Installation DVD Welcome menu.
- Use the Tab or the Right Arrow key to move the highlight to the Skip button and press Enter to go directly to the installation and skip over the media check.
- At the initial Fedora graphical splash screen press Enter or use the mouse to click on the Next button.
- English should be the default language on the language selection screen. If not, select English and click Next.
- The U.S. English Keyboard should be the default. If not, select it and click Next.
- Leave Basic Storage Devices checked and click Next.
- We will not be upgrading any possible existing installation. Choose Fresh Installation and click Next.
- Type the hostname of your computer. Do NOT press Enter or click Next!
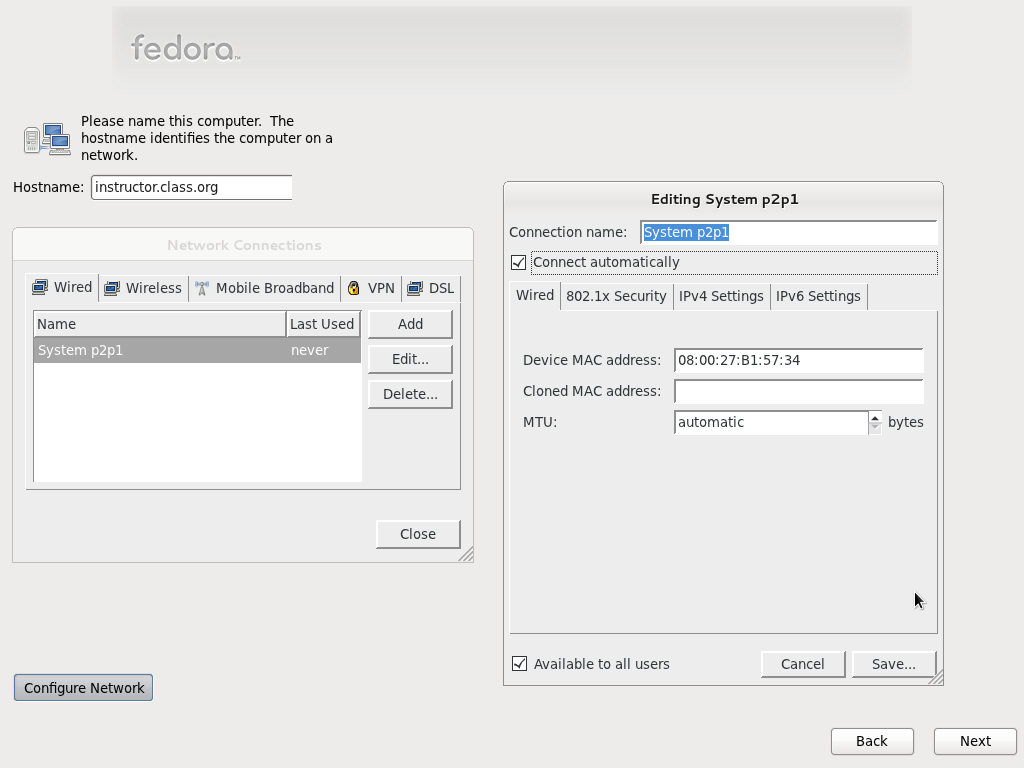
Illustration 2: Click the checkbox for System eth0 or pXpX to connect automatically during startup. The actual device name will be different on your system.
- There is also a button on this page, Configure Network. Click on this button to see the options available. Click on the em1 entry and then the Edit button. The device in Illustration 2 is for a pluggable NIC in motherboard slot 2 and a single port – p2p1. Yours may be “Ethernet Motherboard 1”, i.e., EM1, or some other name depending upon your host. Place a check in the Connect automatically checkbox. This is supposed to start the network during startup. With a server or desktop installation, if you do not check this box the network will not start until a user logs in to the GUI. Although that could be corrected manually after the installation, now is the best opportunity to make this change.
- Click on the IPV4 Settings tab. Notice that although the default is for DHCP to provide configuration data for the NICs, you can also specify a static IP address and manually enter DNS and gateway server entries. Do not change anything here as we will use DHCP for this document.
- When you have finished exploring, click Apply on the Editing System eth0 window and then Close on the Network Connections window.
- Click Next on the Hostname page.
- Select the correct Time Zone for your Location. The default is Eastern/New York. Also remove the check from the System clock uses UTC checkbox.
- Enter the root password (use “lockout” for example, with no quotes) in both spaces and click Next. You will receive a message window indicating that this is a weak password. For this class it is fine and the instructor requires that you use it, so click on Use Anyway.
- There are several options on the next screen which asks which type of installation you would like. Choose the Create custom layout option and click Next.
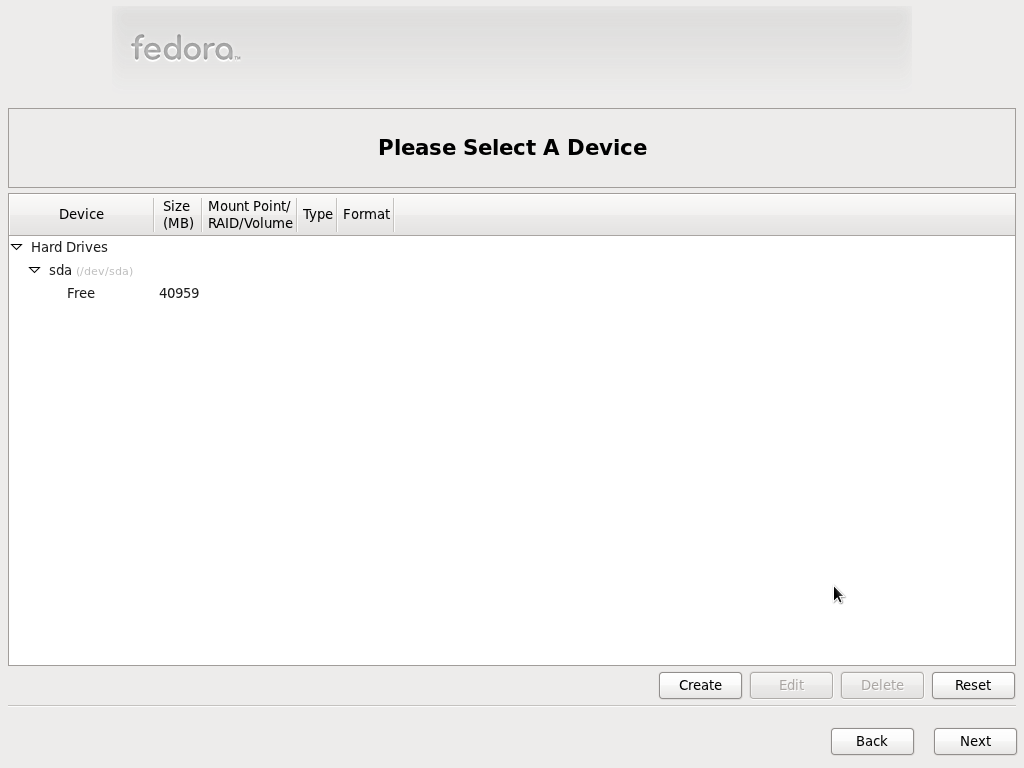
Illustration 3: This disk is empty and ready for partitions to be created.
- If there were partitions on the disk they will be shown on the disk Device screen. If there are any existing partitions, remove all of them. If it was Linux partitions, start with the Logical Volumes, then the Volume Group and the Physical Volume, and end with the /boot and other EXT partitions. Your disk should be empty of partitions and look like Illustration 3. If you need help deleting existing partitions be sure to ask the instructor.
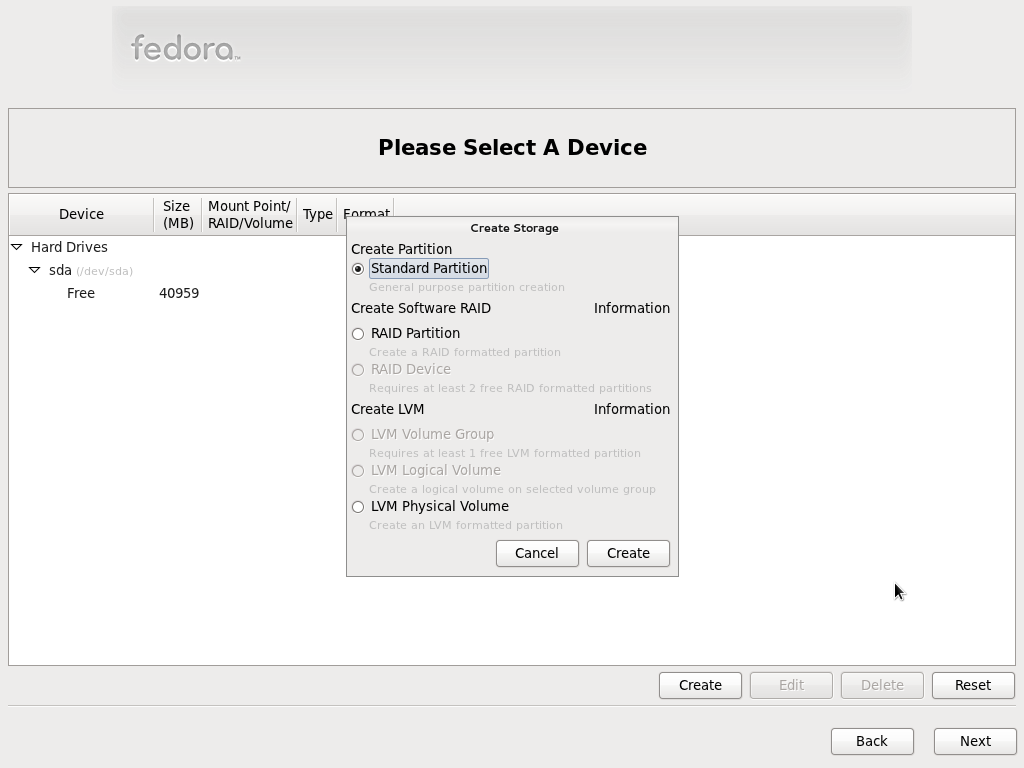
Illustration 4: Create a Standard Partition for /boot.
- You first need a /boot partition so click on the Create button. Be sure to select Standard Partition as shown in Illustration 4, and click Create. The Add Partition window is displayed. Only the /boot partition needs to be a Standard partition.
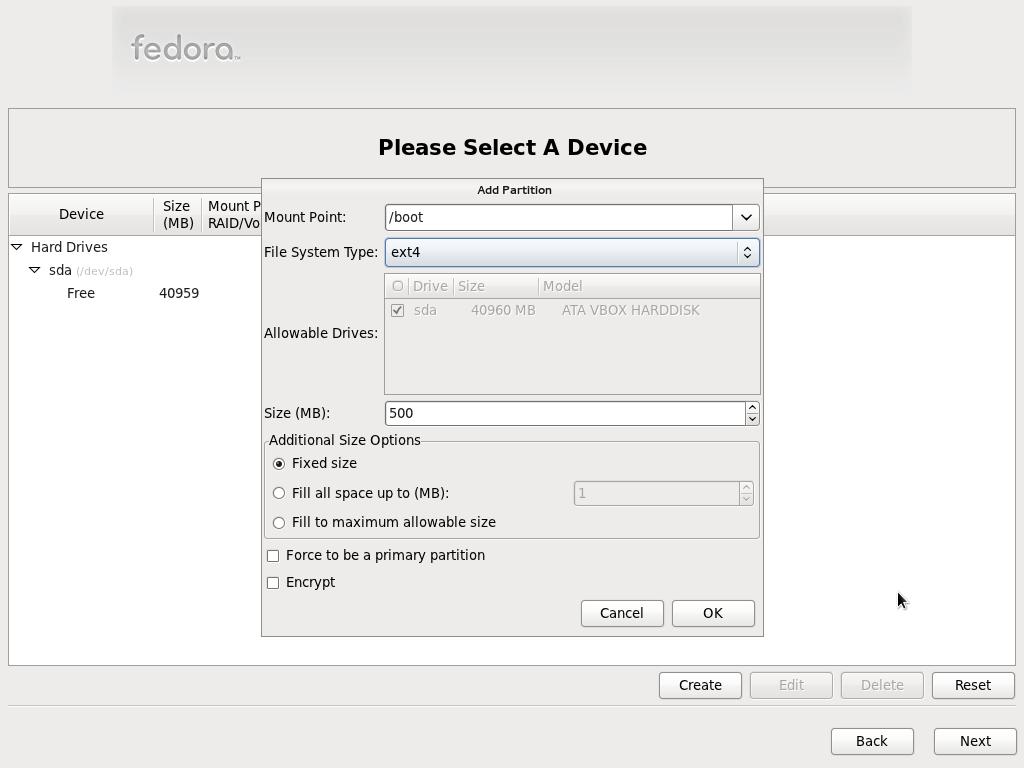
Illustration 5: The /boot partition should be a 500MB EXT4 partition.
In the Add Partition window select /boot from the Mount Point drop-down. Leave the File System type as EXT4 and the size at the default of 500MB. 500MB is the default size for all partitions in this menu, but it is not the best choice for most partitions. Click on OK to create the /boot partition.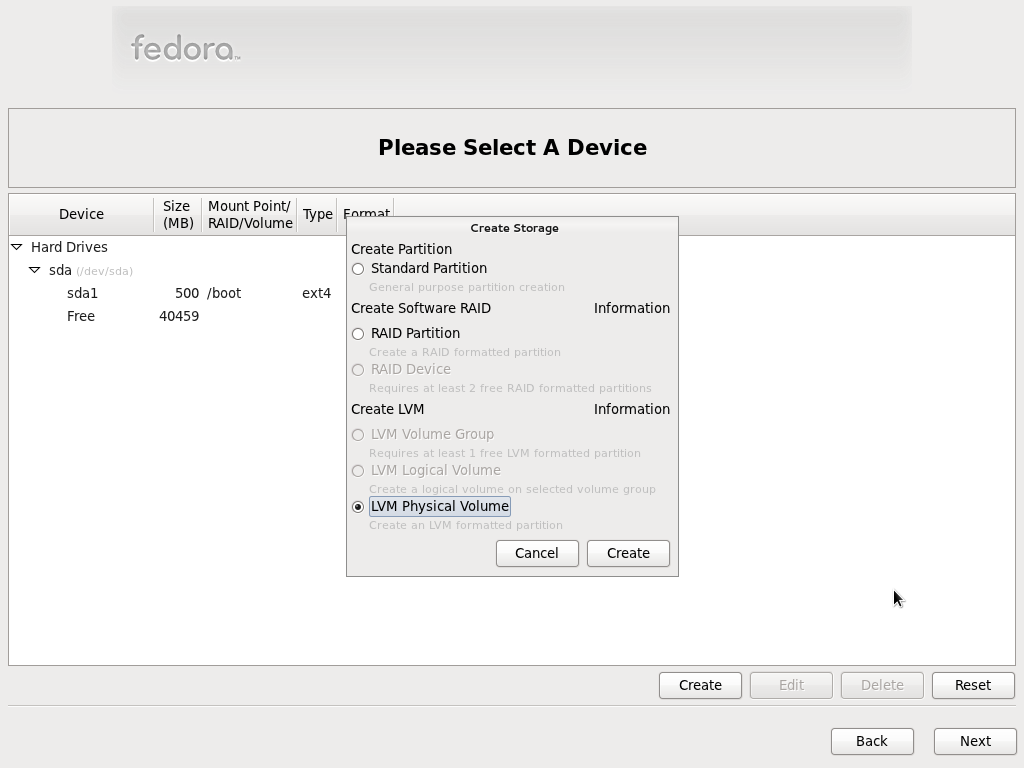
Illustration 6: Create an LVM partition for the rest of the disk space.
- Now you need to create a Physical Volume (PV) out of a portion of the remaining disk space to use for the rest of the Logical Volumes. Click on Create, choose LVM Physical Volume. Type 20000 (20,000MB or 20GB) in the Size field and click OK. At least some of the remaining space on the disk will be used later. It does not normally make sense to create multiple PVs on a single physical hard drive, but this enables us to pretend that there are multiple physical hard drives for later lab projects. We will also leave some unused space on the PV for later use. After creating the new Physical Volume, your disk partitioning should look like Illustration 7.
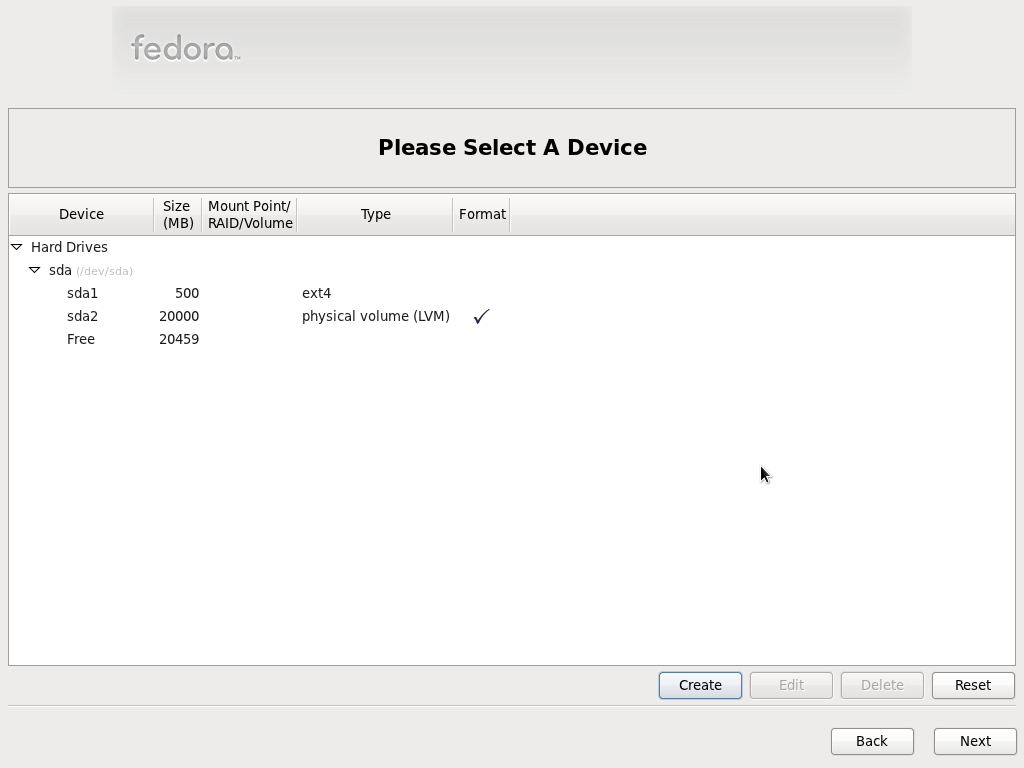
Illustration 7: The completed Physical Volume should look like this.
- The next step is to create a Volume Group (VG). Click the Create button and select LVM Volume Group and click Create.
- At this point you have the Make LVM Volume Group and Make Logical Volume windows displayed. You can create all of the needed Logical Volumes within this window. Select / (root) for the Mount Point. Leave the File System Type at EXT4. Type root for the Logical Volume Name and 2000 (2GB) for the Size. Click the OK button when you are finished entering the data.
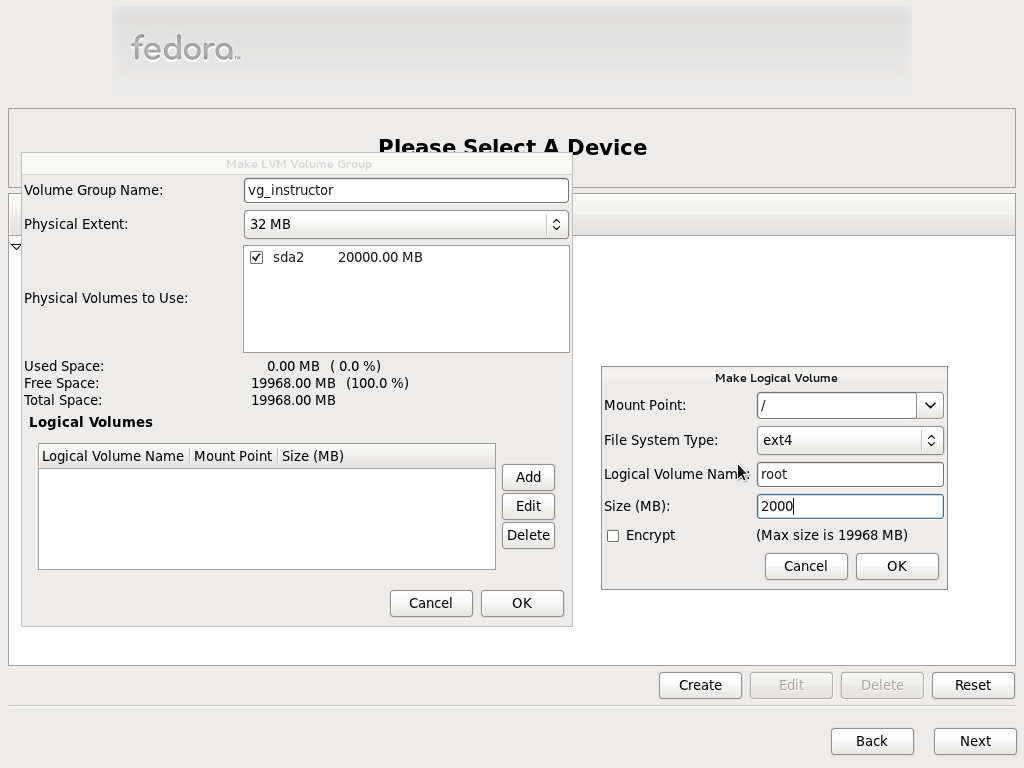
Illustration 8: Creating the Logical Volume for the / (root) partition.
- Now create the rest of the required Logical Volumes using sizes in the sample table below. This table shows all of the partitions and Logical Volumes you should have when you are completed including the /boot partition which was previously created, as well as the Physical Volume (PV) and Volume Group (VG).
-
Mount Point LVM Volume Name Filesystem Type Size /boot No EXT4 500M PV Physical Volume 20GB VG Volume Group / Yes root EXT4 15GB /home Yes home EXT4 2GB /tmp Yes tmp EXT4 2GB /var Yes var EXT4 2GB NA Yes Swap Swap 2GB
Table 1: Filesystem and Volume mount points and sizes. Note that the Volume Group is sized automatically by the sizes of the defined Logical Volumes. Everything else is left as free space in the Volume Group. This uses about 15.5 GB of space. I have installed a full version of Fedora on a NetBook computer with the KDE Desktop along with LibréOffice, Thunderbird, Firefox and other application programs in about 8GB of disk space.
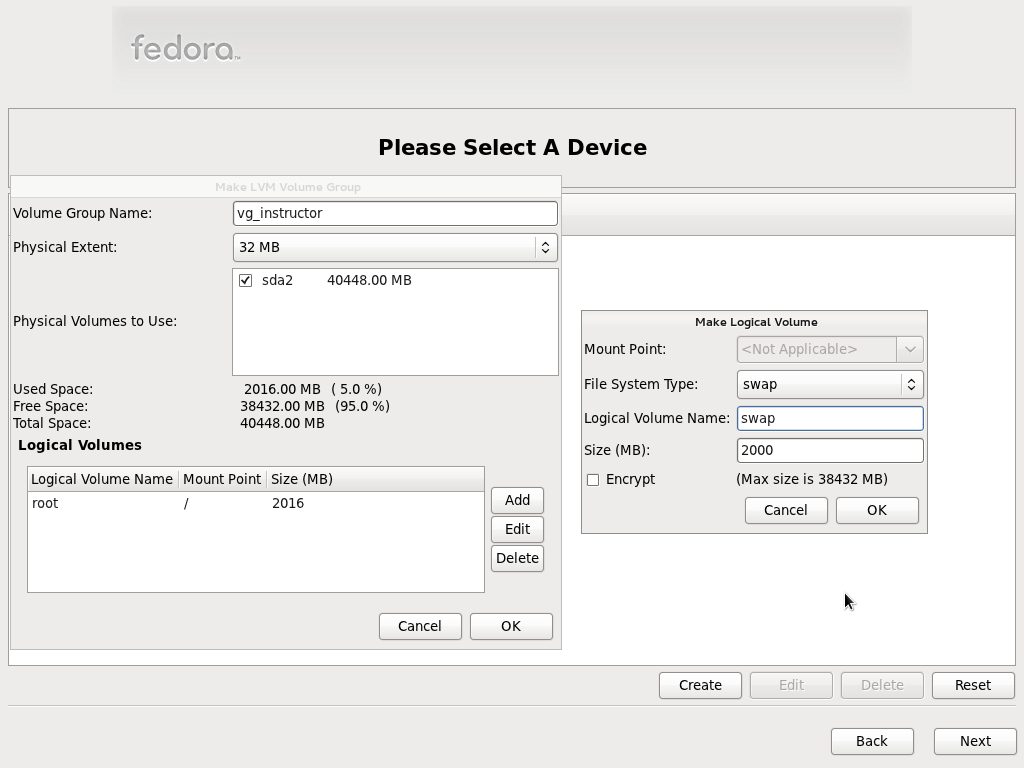
Illustration 9: Creating the Logical Volume to be used for swap space.
- Note that the /tmp filesystem in Illustration 9 is specified as btrfs. Do NOT use BTRFS!! Use EXT4 for all filesystems except swap. The BTRFS filesystem format may be the default in future Fedora Linux systems but there are still some missing utilities such as on-line fsck for btrfs and this is why it is not quite ready for prime time.
- To create the Swap partition, click Add and select Swap as the File System Type.
- Your completed Logical Volumes should look like those in Illustration 10.
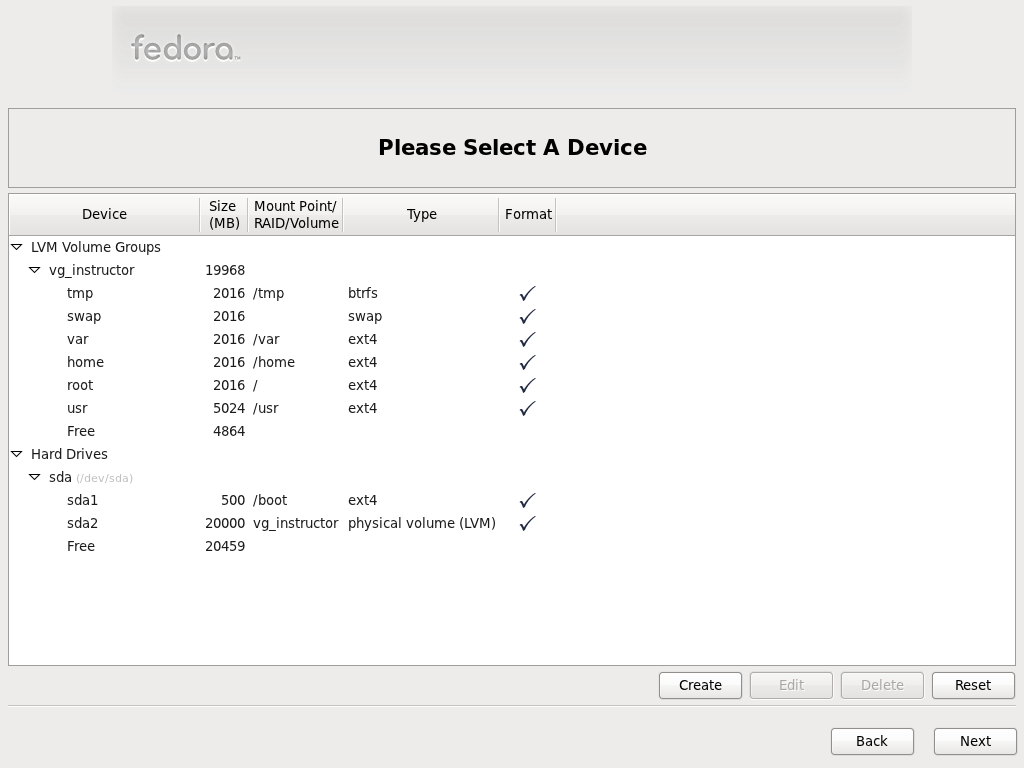
Illustration 10: The completed Logical Volumes should look like this.
Click on the Next button to complete creation of the disk partitions and Logical Volumes. Then click Write Changes to Disk in the Confirm window. At this time the partitioning layout you have just defined will be created and written to the hard drive, and all of the filesystems will be created. If you are installing on a system that had a running operating system this is the point of no return. Once you have clicked on the Write Changes to Disk button, the contents of the disk will be irretrievably overwritten. This is the “No turning back” point. - No changes are required to the Boot Loader configuration so click Next.
- The software selection screen allows the choice of four primary software installation options. Choose Graphical Desktop and ensure that the Customize now radio button is selected. Do not change the repository selection. Click Next.
- The software selection menu is displayed as shown in Illustration 11. Select the various desktop environments as shown, especially the KDE Software Compilation. Linux has multiple desktops which users can choose, providing huge amount of flexibility.

Illustration 11: Select the KDE Software Compilation and other desktop environments.
- Observe while the installation process checks for dependencies, transfers the install image to the hard drive and begins the installation. Notice that there are about 1504 packages being installed for Fedora 15. The minimum number of packages for a minimal Linux system is about 198.
- When you see the “Congratulations, your Fedora installation is complete” screen, remove the DVD and click the Reboot button.