Anaconda Rewrite
This release of Fedora 18 marks the first major change in the installer that I can recall. Anaconda is the standard Red Hat installation program and has been ever since I have been using Red Hat and Fedora. That is at least 17 years as of this writing. And the Anaconda installer is the big story of Fedora 18 as it is the most visible change for those who install their own.
Anaconda has been two separate code bases that were both so old and ratty that a completely new version was created for this release. This version of Anaconda has been completely rewritten from scratch and both text and GUI installations are contained in a single, more easily maintainable code base.
The new installer is also a radically new approach to the process of performing a Fedora installation.
Main Menu
The new Anaconda uses a “hub and spoke” design rather than the serial wizard-like installer design of the past. That is, after a single page to choose the keyboard language for the installation, there is a main menu page that allows the user to choose which components of the default installation to change.
There is only one choice that must be made, that is the Installation Destination, which determines the target hard drive(s) and partitioning. All of the others menu options are…optional. Of course there will likely be good reasons to take some of the other menu options. For example you may need to configure network options such as the IP address, name servers and default route.
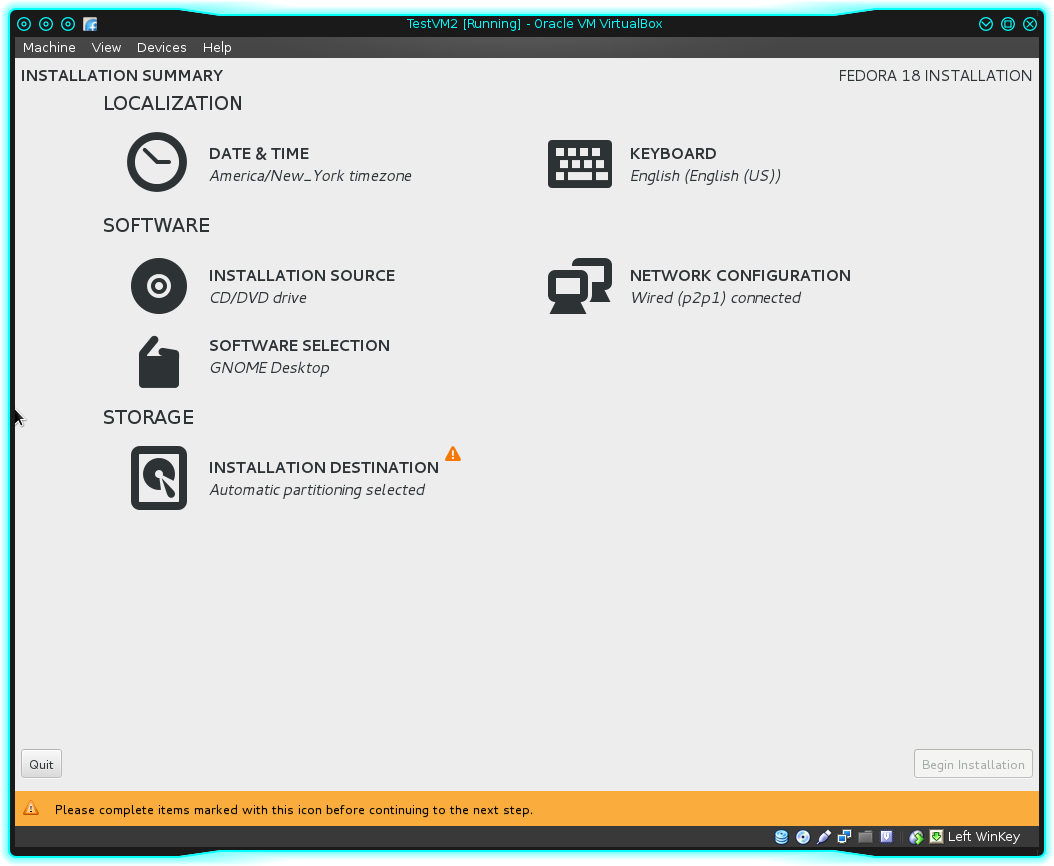
Figure 1: The Fedora 18 Anaconda installer main menu.
Figure 1, above, shows the main menu for the new Anaconda installer. Any changes to a default installation are made by selecting one of the six menu options. Any sub-menus that have choices that must be made are highlighted with an orange warning icon, and so long as any warning icons are left, a bright orange banner at the bottom of the page. It is impossible to proceed with the installation so long as the warning banner is present.
After making selections in each sub menu, you can go on to make other configuration choices and the system works in the background to verify your software selections, for example, and check for dependencies. This multitasking is one of the great advantages of the new installer design, and I recommend selecting your software first so this other activity can take place in the background while you perform other configuration tasks.
I have found that this radically different approach to installation truly does meet the new Anaconda design criterion of making installation easier and faster. It takes far fewer mouse clicks to perform an installation than it ever has before. In part that is because the vast array of installation options that used to be available are not now.
Much of your individual configuration such as installing applications not included with your selected desktop or its options will have to be done post-install. For me this will not be a particular problem since my own direction over the last few years has been to do a basic install with one desktop and then use a script I have developed to install other applications and desktops.
An RPM containing that scripts and some others I have created and find useful is downloadable from the Post-Installation RPM and Script page. A description of the functions of the RPM and the script are included on that page.
Network Configuration
If you have a DHCP server on your network and are happy with the configuration it provides your computer, or you use DHCP to centralize your network configurations, then you don’t need to make any changes here.
However you may wish to set up static IP addressing. This menu allows you to set the static IP address, the netmask, the default gateway, and one or more name servers. After configuring the network, you may have to turn it off and then back on by clicking on the On/Off switch in the upper right corner of the network configuration screen. If that does not show the settings you have configured, click on Save and then reenter the Network configuration menu to verify that the correct settings have been saved.
Notice that the network information under the On/Off switch shows the configuration as well as whether the connection is active or not. If the connection is active you can use the special installation virtual console (Ctrl-Alt-F2) to ping other hosts on your network. You can ping by name if you have an internal name server in order to test the name services configuration as well.
Network configuration has reverted back to having network connection state being active on boot rather than waiting to connect to the network when user logs in. This required that I take an additional step of several clicks during installation or changing ONBOOT=no to ONBOOT=yes after installation. So this is a good change.
Software Selection
Desktops
Your only real options here are to select one of the several desktops available in Fedora 18. Desktop environments are mutually exclusive during installation. So if you like multiple desktops and switch between them, you will have to install your additional favorite desktops later. You must select additional groups for installation when you choose the desktop you want to install.
You can also choose a minimal installation or a server infrastructure installation.
Application Software
Regardless of which desktop you choose to install, no additional application software is installed, such as office, multimedia or Internet applications. You mush choose from a limited list of additional software that you can install once you have clicked on the radio button for your desired desktop.
LibréOffice is no longer installed by default when installing a desktop system. You must explicitly choose to install it or install it later, after the main installation. Other options for software installation include Design Suite, Fedora Eclipse, KDE Applications, and KOffice.
There is no option whatsoever to select individual packages for installation and they must be installed later.
Disk Partitioning
The disk partitioning interface during installation has also changed significantly. The old partition program has been replaced by a newer one that is probably going to be less intuitive for experienced users and system administrators, but which will just as likely be more so for less technical users. I found that after a few installations and I became more familiar with it, the new partitioning interface became more natural and easier to use.
Your options here are to accept a default partition arrangement or to do it yourself. Either way works fine, depending upon what you want from the installation, and so long as there are no partitions already configured on the hard drive.
If the hard drive has existing partitions you have two options. You can allow the Installation Destination menu to create a partition for Linux on any free space, or you can “reclaim” space by deleting any or all of the existing partitions. This part is not especially intuitive, but once you figure it out it works well enough.
Completing the Installation
After making all of your configuration selections, return to the main menu and press the Begin installation button. The next screen shows the progress of the installation with some brief text messages and a progress bar. You will need to set the root password on this page or the install will not complete, but the installation will proceed in the background while you do that.
Upgrades—Not!
There are no options to perform an upgrade to an existing installation. The new Anaconda installer does not detect existing installations with an option to perform an upgrade. There is a new upgrade procedure that works over the Internet or with a local DVD or ISO image, called fedup. The fedup program is also new and so potentially has bugs. Chapter 19 of the on-line and downloadable Fedora 18 Installation Guide seems to recommend reinstallation wherever possible rather than upgrades.
I tried using fedup to perform an upgrade from Fedora 17 on a fairly simple virtual machine configured as a desktop. After the upgrade from a DVD it was necessary to perform a YUM update to get all of the latest updates. Missing RPMFusion repository GPG keys further confused the upgrade issue or perhaps were the primary cause.
I was able to perform an upgrade on a physical pizzabox that I am using as a firewall and router but it had a pretty minimal installation. However I did install the missing GPG key links in /etc/pki/rpm-gpg. I did this after running the fedup -v –network 18 command. The commands I used to create the missing links are shown below.
RELEASE_NUMBER=18
ln -s RPM-GPG-KEY-rpmfusion-free-fedora-$RELEASE_NUMBER-primary  RPM-GPG-KEY-rpmfusion-free-fedora-$RELEASE_NUMBER
ln -s RPM-GPG-KEY-rpmfusion-free-fedora-$RELEASE_NUMBER-primary  RPM-GPG-KEY-rpmfusion-free-fedora-$RELEASE_NUMBER-i386
ln -s RPM-GPG-KEY-rpmfusion-nonfree-fedora-$RELEASE_NUMBER-primary  RPM-GPG-KEY-rpmfusion-nonfree-fedora-$RELEASE_NUMBER
ln -s RPM-GPG-KEY-rpmfusion-nonfree-fedora-$RELEASE_NUMBER-primary  RPM-GPG-KEY-rpmfusion-nonfree-fedora-$RELEASE_NUMBER-i386
I will be experimenting more with using fedup but for now I also recommend against performing an upgrade and will do reinstallations.